

Building your inventory
Your inventory is the list of vendors and products your team actually uses — and it's what Recon uses to decide which vulnerabilities are relevant to you. When a new CVE affects something in your inventory, your Smart Alerts flag it, so keeping your inventory accurate is what keeps your alerts accurate.
You add the vendors and products you care about manually, choose whether they're shared with your team or just for you, and organise them with labels and suppliers. (Need to bring in a big list from a spreadsheet? Email us at [email protected] and we'll help you import it.)
Jump to a section:
- Why your inventory matters
- Org vs personal inventory
- Add vendors and products
- Organising with labels
- Tagging software to suppliers
- Managing your inventory
- Keeping your inventory up to date
- Troubleshooting
Why your inventory matters
Recon tracks thousands of new vulnerabilities. Your inventory is how it knows which ones are yours. Each vendor–product pair you add — say Microsoft > Windows 11 — tells Recon to watch that software on your behalf.
This feeds straight into Smart Alerts. When you create a vulnerability alert, you choose which inventory it watches — your Organisation inventory, your Personal inventory, or the entire global CVE feed. Attach an inventory and the rule only fires for CVEs affecting the vendors and products you track — on top of the rule's other conditions — so you cut out noise from software you don't use.
When an alert fires, Recon shows whether your Org or Personal inventory matched the CVE, and highlights the labels on the affected vendors and products — so you can see at a glance which part of your business is involved.
Your inventory also focuses other views: filter the Trends page to your inventory to see only the emerging threats affecting your stack, and your Home dashboard surfaces what's under active alert. In short, what you put in your inventory shapes what you get alerted on, what you see across Recon, and — through labels — the context that comes with it.
Org vs personal inventory
When you add to your inventory, you choose one of two scopes:
- Org inventory — shared across your whole team. Use this for the software your organisation actually runs, since it drives the alerts everyone relies on.
- Personal inventory — visible only to you. Use this to track things you're personally interested in without changing the team's shared list.
You'll pick between them each time you add, via the Add to inventory button.
Add vendors and products
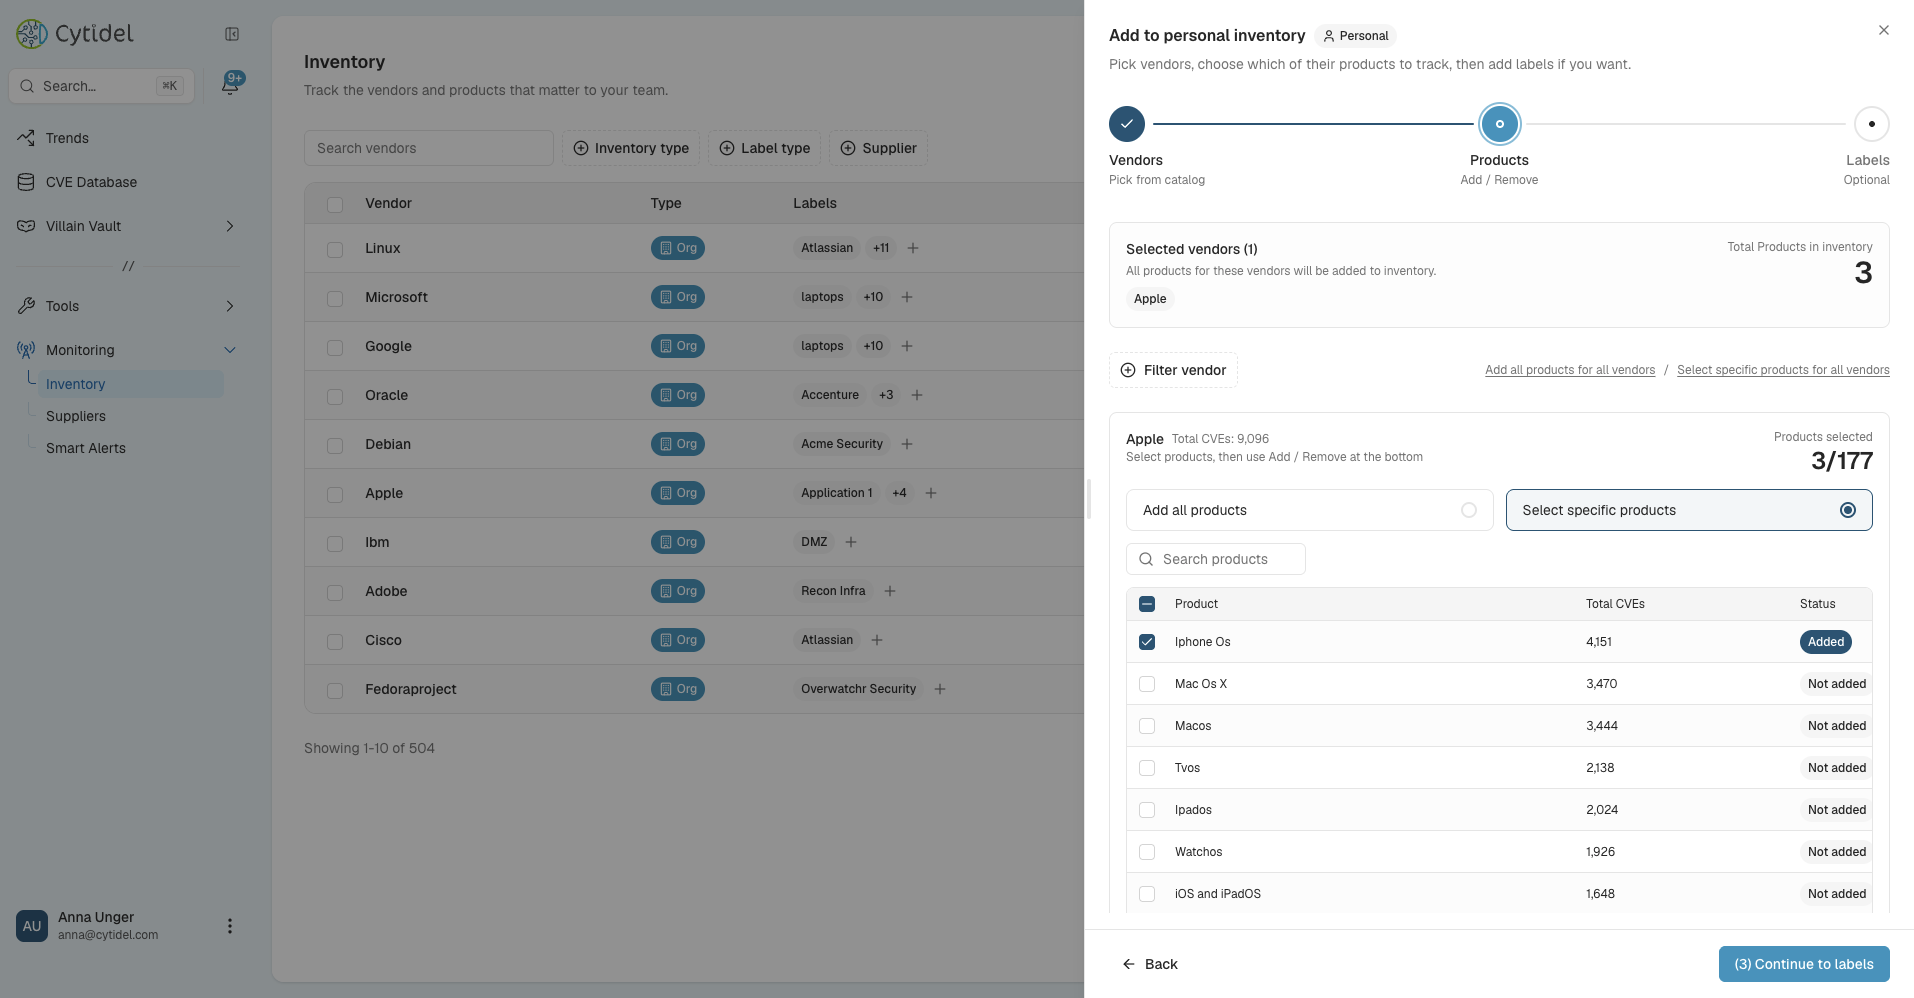
Go to Monitoring > Inventory in the left menu, click Add to inventory, and choose Org inventory or Personal inventory. The wizard has three steps: Vendors → Products → Labels.
1. Pick your vendors
- Use Search vendors to find the ones you use, then tick each vendor you want to add. Vendors already in your inventory are marked Already assigned.
- Each vendor shows its Total CVEs and how many Products it has, to help you decide.
- Click Continue.
2. Choose products
For each vendor you selected, choose how much to track:
- Add all products — adds every product under that vendor. Any new products the vendor releases later are added to your inventory automatically, so you stay covered without coming back.
- Select specific products — pick only the products you actually use.
To move quickly, use Add all products for all vendors or Select specific products for all vendors to apply the same choice across everything at once. When you're happy, click Continue to labels.
3. Assign labels (optional)
Labels are optional but useful — they organise your inventory and add context to your alerts. You can assign them now or any time later. Click Assign labels, choose the labels you want, and click Apply, then Finish to save. See Organising with labels for how they work.
Organising with labels
Labels are free-form tags you create to organise your inventory — for example by team, environment, or importance. They're a single, flat, searchable list (there are no fixed categories).
You manage your labels under Settings > Labels — add the labels your team uses, and edit or delete them there. That screen also shows how many items each label is associated with.
To assign labels from the inventory, click Assign labels, tick the ones you want (or use Select all), and click Apply. You can apply them at two levels:
- Full-vendor labels apply to every product under a vendor. If you chose Add all products for that vendor, any new product added later inherits these labels automatically — so your labelling stays complete as the vendor's catalogue grows.
- Per-product labels apply only to the specific products you choose, which is handy when different products serve different parts of your business.
Labels power the Label type filter on the inventory page. And when a CVE matches your inventory, your Smart Alert highlights the labels on the affected vendors and products — so you can see at a glance which part of your business is involved.
Tagging software to suppliers
Alongside labels, you can tag a vendor's software to a supplier — one of the third parties in your supplier registry (Monitoring > Suppliers). This is a second way to organise your inventory, and it powers supplier-scoped alerting: a vulnerability alert can be set to watch a supplier's software (the "By supplier" scope), so you're alerted to vulnerabilities in the products a given supplier provides you.
To tag software to a supplier:
- From a vendor's Edit panel, use Assign supplier, or
- Select products in the table and use Assign supplier in the bulk-action bar.
Tagged suppliers appear in the Suppliers column and can be filtered with the Supplier filter. (For managing the supplier registry and setting up breach alerts, see Monitoring third-party suppliers.)
Managing your inventory
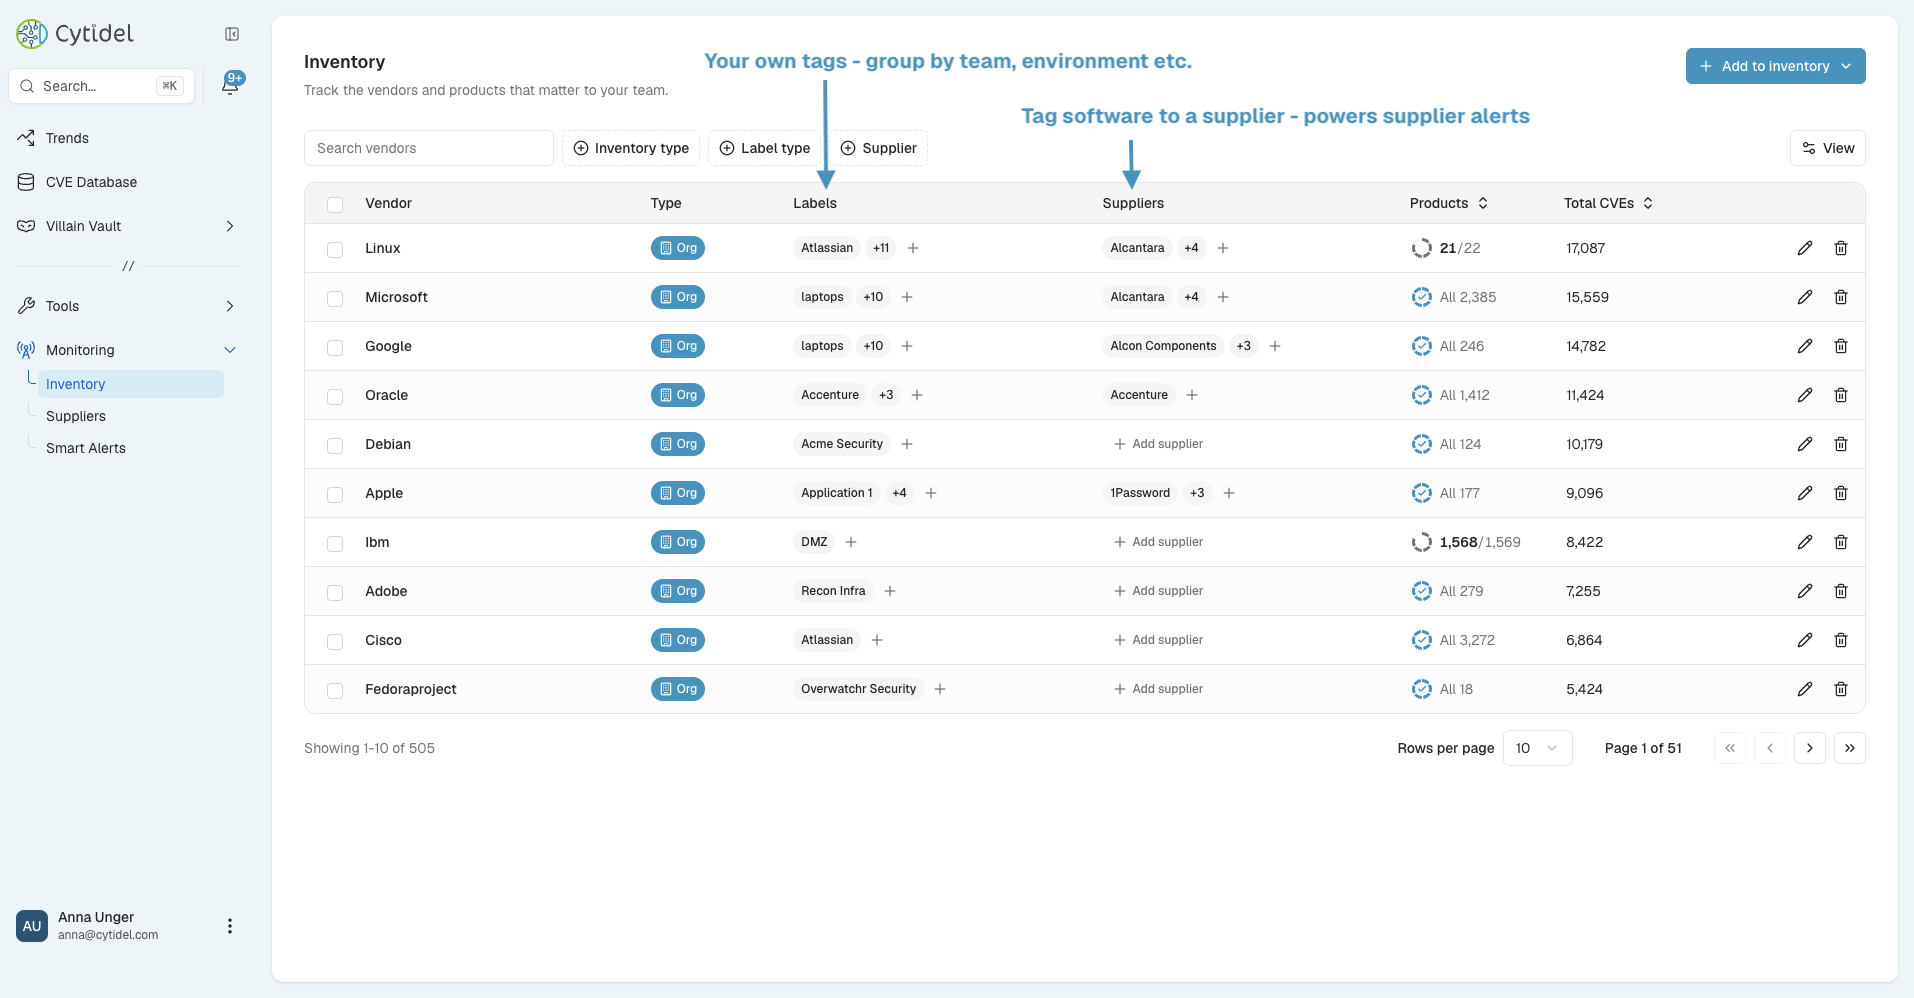
On the Inventory page you can see everything you're tracking, with columns for Type (Org or Personal), Labels, Suppliers, Products (how many products you're tracking for that vendor, out of the total available), and Total CVEs.
From here you can:
- Search for a vendor using the search box.
- Filter the list by Inventory type, Label type, or Supplier.
- Show or hide columns using the View button.
- Edit a vendor (the pencil icon) to change its products, labels, or supplier tags.
- Remove a vendor (the trash icon) when you no longer need to track it.
Keeping this list tidy and current is worth the effort — it's the difference between alerts that matter and alerts you ignore.
Keeping your inventory up to date
Your technology stack changes over time, so it's worth reviewing your inventory now and then. Add new vendors and products as you adopt them, and remove anything you've retired. Keeping the list current is what keeps your Smart Alerts aligned with your environment — so you don't get alerts for software you no longer run, or miss them for software you've just brought in.
Because an inventory is attached to your rules rather than copied into them, you only have to keep the inventory itself accurate — every rule scoped to it stays up to date automatically, with no need to edit each rule.
Troubleshooting
I added a vendor but I'm not getting alerts for it. Alerts only fire when a Smart Alert rule is set up and its conditions are met. Check that you have a rule whose scope points at the right inventory (Organisation or Personal) — if a rule watches the entire CVE feed it isn't limited to your tracked items, and if it's scoped to an inventory, the vendor/product needs to be in that one. Then confirm the rule's trigger conditions actually match the CVE.
What's the difference between full-vendor and per-product labels? Full-vendor labels apply to every product under a vendor (and new products inherit them automatically if you chose "Add all products"). Per-product labels apply only to the products you pick. Use full-vendor for blanket tags and per-product for exceptions.
I added a vendor to my personal inventory but my team can't see it. Personal inventory is visible only to you. To share it with your team, add it as Org inventory instead.
A vendor shows fewer products than it has available (e.g. "3/22"). That's expected — it means you're tracking 3 of the vendor's 22 products. To track more, edit the vendor and add products, or choose Add all products.
Will new products get tracked automatically? Only if you chose Add all products for that vendor. If you selected specific products, new releases won't be added until you add them yourself.
Updated 2 months ago